
This guide will show you how easy it is to compress video files using ffmpeg.
Follow this guide, for instructions to easily install ffmpeg. Once you have it installed, you will be able to use ffmpeg via any command line.
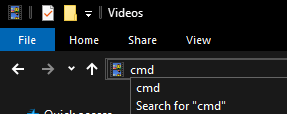
Go to your Videos folder. Assuming you have a video in your Videos folder which you would like to compress.

Then type ‘cmd’ into the address bar and press enter. This will open a Command Prompt inside the videos folder.
Next copy this command and paste it into the Command Prompt. You can paste it using shift + insert
ffmpeg -i input.mp4 -vcodec libx264 -crf 20 output.mp4Next either use the arrow keys, backspace button and other keyboard keys to rename ‘input.mp4’, to your video name. Or rename your video in the Videos folder, to ‘input.mp4’. Your file extension might not be ‘mp4’, if that is the case, then rename it to ‘input.your-file-extension’.
When you are happy, press enter in the Command Prompt. A new compressed video will be created called ‘output.mp4’. You will need to wait. How long depends on the size of the video. If the command fails, double check the name of the input file.
If the video is still to large size wise, or the quality is not good enough. Then you can change the number ’20’ to something else. 17 to 28 are the recommended range, but you can read the details in the link below. A lower number produces better quality, at the expense of storage space. Whilst a larger number reduces quality, but saves more space.
Thank you for reading this tutorial, I hope you found it useful!
Learn how to create a gif from a video file using ffmpeg here.
Or learn how to combine video files using ffmpeg here.
