
Learn how to code a posterisation shader using the GLSL programming language. Posterisation reduces the number of tones in an image, which creates a cool cartoon like visual effect.
Fragment Shader
We will code the posterisation visual effect in a fragment shader.
New File
First create a new file, and call it ‘Posterise.frag’.
GLSL Version
Add the following code to the file to define the GLSL version.
#version 330 core
The tutorial will use OpenGL 3.3.
Samplers
Next add a sampler.
uniform sampler2D textureUnit;
The ‘textureUnit’ will be the image texture which we are posterising.
Step Total
The step total is used to define the number of tones.
uniform float stepTotal = 4.0f;You can change the step total to whatever you want outside the shader.
Texture Coordinates
Used to sample the pixel colours from a texture.
in vec2 texCoord;
Output Colour
The output colour of the fragment shader.
out vec4 fragColour;
Posterise Function
Next add a function for posterising a value.
// Input: Normalised between 0 and 1
float Posterise(float x)
{
	return floor(x * stepTotal) / max(stepTotal, 1.0f);
}
So the function passes in a value called ‘x’, which we expect to be in the 0 to 1 range. The value will be multiplied against the step total to figure out which step it is closest to when floored. The floor function rounds a value downwards to the nearest integer.
floor(x * stepTotal)If ‘x’ is 0.6. Then: 0.6 * 4 = 2.4.
And when floored, this will be 2.0.
Finally we divide by the step total to get the closest tone.
max(stepTotal, 1.0f);The max function is used to avoid a divide by zero.
2.0 / 4.0 = 0.5.
So if we use ‘4.0f’ for the step total, then we could have the following tone values in a texture:
0.0, 0.25, 0.5, 0.75, 1.0.
Since: 1.0 / 4.0 = 0.25.
Posterise Vec3
Lets write one more posterise function, which will posterise a vec3 instead of a single float.
// Input: Normalised between 0 and 1
vec3 Posterise(vec3 colour)
{
	return floor(colour * stepTotal) / max(stepTotal, 1.0f);
}
Main Function
Create a main function, and put this code in it.
void main()
{
	// Get pixel colour
	vec4 pixel = texture(textureUnit, texCoord);

	// Posterise RGB pixel colour channels
	fragColour.rgb = Posterise(pixel.rgb);
	fragColour.a = pixel.a;
}
We first get the pixel colour from the texture.
vec4 pixel = texture(textureUnit, texCoord);Then we posterise the pixel colour using the posterise function from earlier. And set the result to the output fragment colour.
fragColour.rgb = Posterise(pixel.rgb);Finally we set the output alpha to the pixel colour.
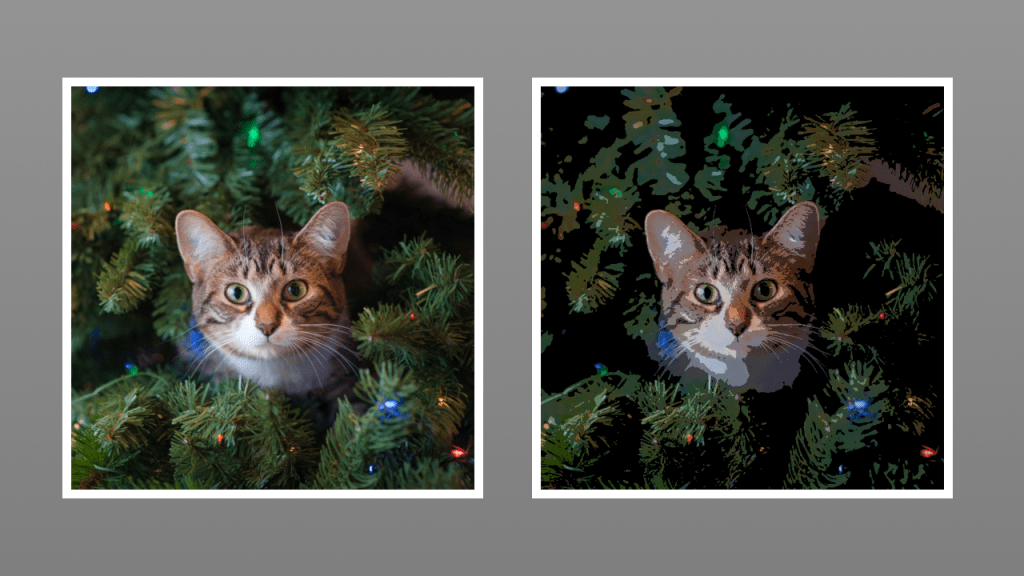
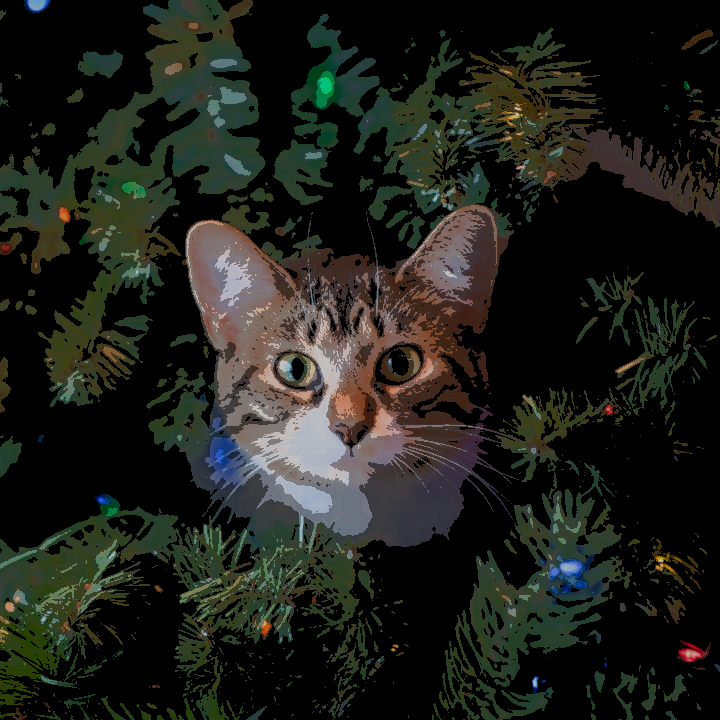
fragColour.a = pixel.a;This code will produce a cool looking cartoon cat image!
Now there is nothing wrong with this version, but lets see if we can create an even cooler one!
Posterise Image
Create a new function called ‘PosteriseImage’. The function takes a vec3 which is our pixel colour.
// Input: RGB
vec3 PosteriseImage(vec3 colour)
{
	// HSV
	// Uses the maximum of the three components
	float lightness = max(max(colour.r, colour.g), colour.b);

	float posterisedLightness = Posterise(lightness);

	// Colourise the lightness
	colour *= posterisedLightness;

	return clamp(colour.rgb, 0.0f, 1.0f);
}
We first get the lightness value using the HSV colour format brightness. An RGB colour can be converted to a HSV brightness simply by getting the maximum value from the RGB colour format. So if red is greater than green and blue, then the maximum would be red.
float lightness = max(max(colour.r, colour.g), colour.b);Next we will posterise the lightness value using the posterise function we wrote earlier. This is the single float version, not the vec3 version.
float posterisedLightness = Posterise(lightness);Then we will colourise the lightness by multiplying against the pixel colour.
colour *= posterisedLightness;Finally we just need to return the pixel colour. We use the clamp function to make sure the values stay in the 0 to 1 range.
return clamp(colour.rgb, 0.0f, 1.0f);Main Function V2
Lets rewrite the main function, to use the new posterise image function. Notice how the posterise RGB bit of code has been removed.
void main()
{
	// Get pixel colour
	vec4 pixel = texture(textureUnit, texCoord);

	// Get posterise colour
	vec3 post = PosteriseImage(pixel.rgb);

	// Mix original pixel colour and posterise colour
	fragColour.rgb = mix(pixel.rgb, post.rgb, step(1.0f, stepTotal));
	fragColour.a = pixel.a;
}
We first get the pixel colour again.
vec4 pixel = texture(textureUnit, texCoord);Then we get the posterised version of the pixel colour, and store it in a new variable.
vec3 post = PosteriseImage(pixel.rgb);Next we will mix the original pixel colour and posterised colour. We only use the posterised colour if the step total is not zero. This means we can use zero to turn the effect off from outside the shader.
fragColour.rgb = mix(pixel.rgb, post.rgb, step(1.0f, stepTotal));Finally we just need to set the output fragment alpha to the pixel alpha.
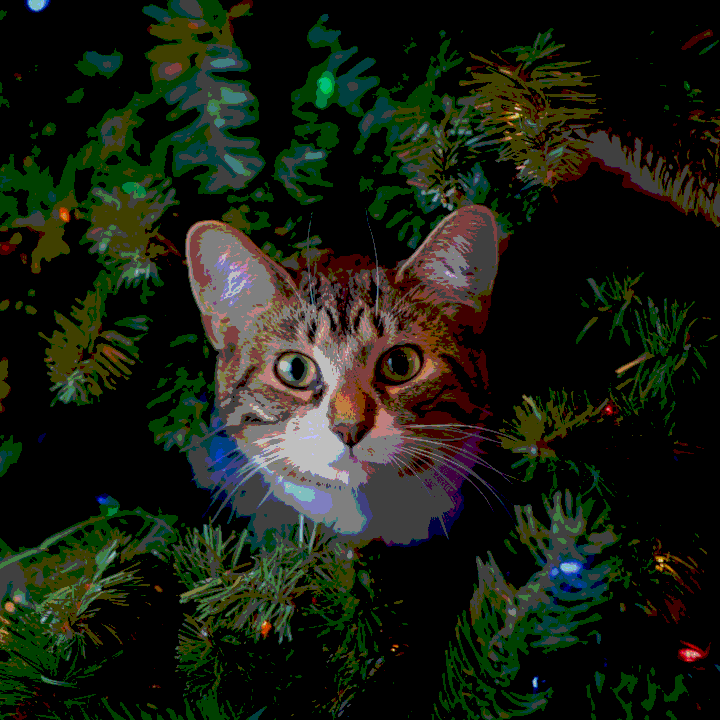
fragColour.a = pixel.a;And this is the result we get. Looks pretty smooth, but it’s a little dark.
Posterise Image V2
Lets rewrite the posterise image function, so that we can brighten up the cat image, without losing the smoothness.
// Input: RGB
vec3 PosteriseImage(vec3 colour)
{
	// HSV
	// Uses the maximum of the three components
	float lightness = max(max(colour.r, colour.g), colour.b);

	float posterisedLightness = Posterise(lightness);

	// Ratio of posterised lightness to maximum lightness
	float ratio = (posterisedLightness / max(lightness, 0.0001f));

	// Colourise the lightness
	colour *= ratio;

	return clamp(colour.rgb, 0.0f, 1.0f);
}
We will use the ratio between the posterised lightness and the original lightness which we obtained from the RGB pixel colour. The original lightness should be greater than the posterised lightness. Again we avoid a potential divide by zero using the max function.
float ratio = (posterisedLightness / max(lightness, 0.0001f));So all we need to do now is multiply the ratio against the pixel colour.
colour *= ratio;So lets imagine the pixel colour has a lightness value of 0.6. When we posterise 0.6, we would get 0.5. If we divide 0.5 / 0.6. Then we get 0.83 recurring for the ratio. Notice how this is higher than 0.5. Which means we will lose less of the lightness from the final pixel colour when we multiply against it using the ratio above.
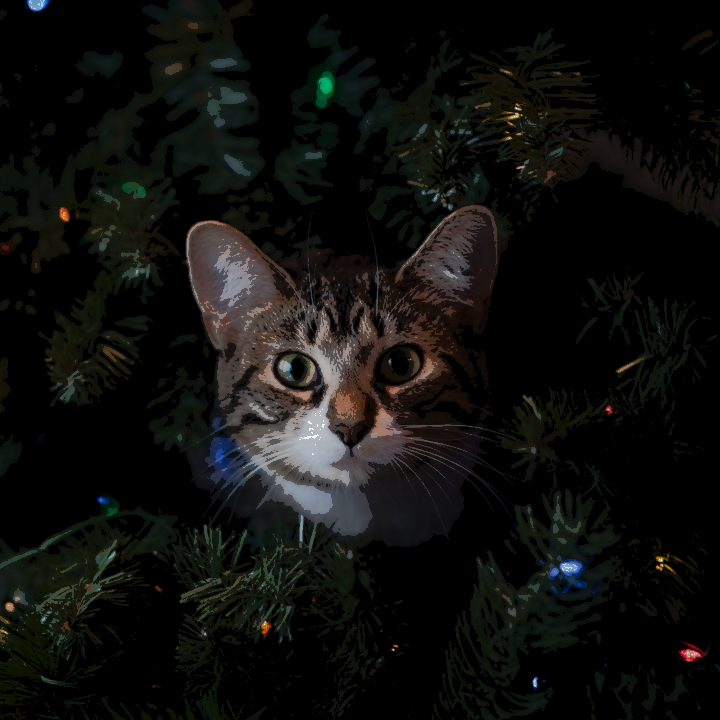
And here is the result. Notice how it is brighter than the last version, but there is some optional artefacts which we can remove from the image.

Cleaning Up Artefacts
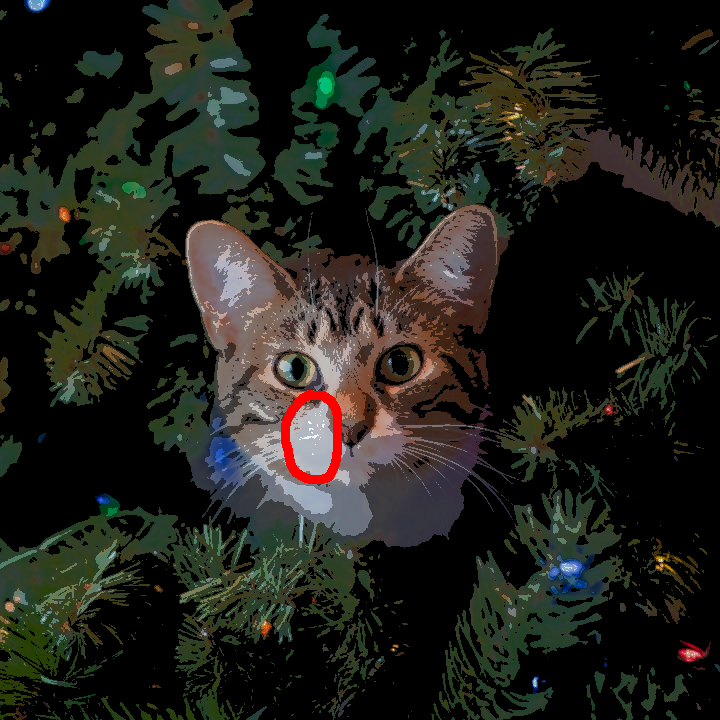
If you look at the red circle in this image, you can see some small artefacts near the cat nose.
We can clean up these artefacts by reducing the lightness value slightly.
lightness *= 0.99f;Notice how this change is placed just after getting the maximum lightness value from the RGB pixel colour.
// Input: RGB
vec3 PosteriseImage(vec3 colour)
{
	// HSV
	// Uses the maximum of the three components
	float lightness = max(max(colour.r, colour.g), colour.b);

	// Reduce lightness by a small amount to remove artifacts at high lightness
	lightness *= 0.99f;

	float posterisedLightness = Posterise(lightness);

	// Ratio of posterised lightness to maximum lightness
	float ratio = (posterisedLightness / max(lightness, 0.0001f));

	// Colourise the lightness
	colour *= ratio;

	return clamp(colour.rgb, 0.0f, 1.0f);
}
And here is the final version, with the artefacts cleaned up!
Full Code
See the full code here.
// OpenGL 3.3
#version 330 core

// Texture Unit
uniform sampler2D textureUnit;

uniform float stepTotal = 4.0f;

// Texture coordinate
in vec2 texCoord;

// Final colour
out vec4 fragColour;

// Input: Normalised between 0 and 1
float Posterise(float x)
{
	return floor(x * stepTotal) / max(stepTotal, 1.0f);
}

// Input: RGB
vec3 PosteriseImage(vec3 colour)
{
	// HSV
	// Uses the maximum of the three components
	float lightness = max(max(colour.r, colour.g), colour.b);

	// Reduce lightness by a small amount to remove artifacts at high lightness
	lightness *= 0.99f;

	float posterisedLightness = Posterise(lightness);

	// Ratio of posterised lightness to maximum lightness
	float ratio = (posterisedLightness / max(lightness, 0.0001f));

	// Colourise the lightness
	colour *= ratio;

	return clamp(colour.rgb, 0.0f, 1.0f);
}

void main()
{
	// Get pixel colour
	vec4 pixel = texture(textureUnit, texCoord);

	// Get posterise colour
	vec3 post = PosteriseImage(pixel.rgb);

	// Mix original pixel colour and posterise colour
	fragColour.rgb = mix(pixel.rgb, post.rgb, step(1.0f, stepTotal));
	fragColour.a = pixel.a;
}
Conclusion
Thank you for reading this tutorial, you have learned how to create a posterisation shader using the GLSL programming language. We wrote a shader which reduces the number of tones in an image, to create a cool cartoon like visual effect.
We posterised the image using the RGB colour format, and then we used the HSV brightness of a pixel colour. But there are plenty of other methods and colour formats which you can experiment with to create a posterisation effect.
Further Reading
For further reading check out the different colour formats below. The lightness section gives you the formulas for HSI, HSL and luma which you can try posterising!
For a more visual approach, check out the GIMP image editor’s desaturate function. It has multiple modes which can be used to desaturate an image. All of them can be used to produce interesting posterisation effects.
Cat Image
The awesome cat image used for this tutorial came from Pexels. You can see it below.
Shallow Focus Photo of White and Brown Cat · Free Stock Photo
