This tutorial will teach you how to create a dissolve shader using the GLSL programming language. You will also learn how to apply an optional burning effect, and how to create the dissolve texture. A dissolve shader can be used to make an image disappear over time.
Image
I used the following awesome image from Pexels for this tutorial.

Greyscale Gradient
This is how the dissolve effect looks with a greyscale gradient.

Notice how the dark areas at the bottom of the image get dissolved first.

This is how the dissolve texture looks as it is changed over time. Notice how everything gets darker. When black is reached, the pixel is completely dissolved.

Now here is the dissolve with a burning effect applied. Notice how the burn is applied next to the edge which is about to get dissolved.

The burn effect looks like this. The burn area is white nearest the edge, and forms a greyscale gradient which moves towards the black.

Solid Noise
Next this solid noise texture will be applied to an image.

Using the solid noise texture to dissolve the image.

This is how the dissolve texture looks as it is changed over time. Notice how the dark areas disappear first, and how everything gets darker over time. When black is reached, the pixel is completely dissolved.
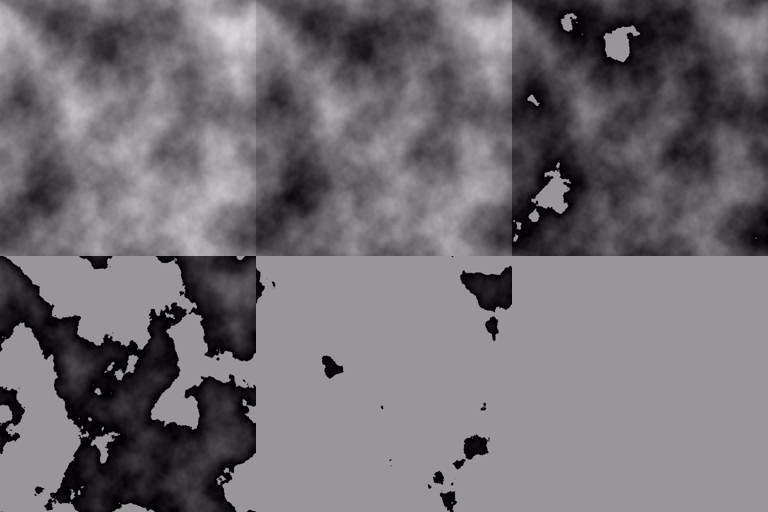
Now here is the dissolve with a burning effect applied.

The burn effect looks like this. The burn area is white nearest the edges which are about to get dissolved. A greyscale gradient forms near the edges and moves towards the black. The black area is currently not dissolved, whilst the transparent areas are completely dissolved.

Dissolve Texture
I have written another tutorial here, which will teach you how to create textures for a dissolve shader in the GIMP image editor.
Fragment Shader
Next learn how to write the fragment shader using the GLSL programming language.
New File
First create a new file, and call it ‘Dissolve.frag’.
GLSL Version
Add the following code to the file to define the GLSL version.
#version 330 coreThe tutorial will use OpenGL 3.3.
Samplers
Next add two samplers.
uniform sampler2D textureUnit;
uniform sampler2D dissolveTexture;
The ‘textureUnit’ will be the main texture. And the ‘dissolveTexture’ will be used for the dissolve.
Colour Uniforms
Next add two uniforms to control the colour of the final image.
uniform vec4 textureColour;
uniform vec3 burnColour;
The ‘textureColour’ uniform will be used to change the colour of the main texture. The ‘burnColour’ will be used to change the colour of an optional burning effect which is applied on the boundary of the dissolve.
Dissolve amount
This uniform controls the dissolve effect.
uniform float dissolveAmount = 0.0f;Zero means that the final image is completely visible (not dissolved).
One means that the final image is completely invisible (dissolved).
So the effect is usually controlled by changing a value from 0 to 1 over time.
Burn Size
Controls the size of the burn effect.
uniform float burnSize = 0.1f;Brightness
Controls the brightness of the burn effect.
uniform float burnBrightness = 1.0f;Texture Coordinates
Used to sample the pixel colours from a texture.
in vec2 texCoord;Output Colour
The output colour of the fragment shader.
out vec4 fragColour;Constant
A constant defining a small number.
const float SMALL_NUMBER = 0.0001f;Main Function
Next define a main function.
void main()
{
// Code goes here
}
All future code will be added inside of the main function.
We first get the value of the red channel in the dissolve texture. Since the dissolve texture should be a greyscale colour, we only need one of the colour channels.
float value = texture(dissolveTexture, texCoord).r;Next we will multiply the value variable by a value close to one, so that the value is never one. This is to stop white pixels from showing.
value *= 0.999f;Now we will create a variable to check if the pixel should be visible or not. We subtract the dissolve amount from the value variable.
float isVisible = value - dissolveAmount;If the is visible value is below zero, then we will discard the pixel. Since this means this pixel has been completely dissolved.
if(isVisible < 0.0f) discard;Now we will get the main texture colour and multiply it against the texture colour uniform. Then it is stored in the fragment colour output variable.
fragColour = texture(textureUnit, texCoord) * textureColour;Next we will add the optional burning effect.
float isBurning = smoothstep(abs(burnSize) + SMALL_NUMBER, 0.0f, isVisible) * step(SMALL_NUMBER, dissolveAmount);The step function is used to stop the burning effect from being active when the pixel is completely visible (and not dissolved).
The smoothstep function is used to create a smooth gradient from the edges of completely dissolved pixels using the is visible variable. The abs function makes sure that burn size is not a negative number, and the small number constant is used to prevent a potential divide by zero in the smoothstep function.
Finally we just need to add the burn colour and multiply it by the is burning variable and burn brightness uniform. The is burning variable will control whether the burn effect is active.
fragColour.rgb += burnColour * isBurning * burnBrightness;Full Shader Code
Here is the full GLSL shader code.
// OpenGL 3.3
#version 330 core

// Texture Unit
uniform sampler2D textureUnit;
uniform sampler2D dissolveTexture;

// Colour
uniform vec4 textureColour;
uniform vec3 burnColour;

// Range from 0.0f to 1.0f
// 1.0f means the texture is completely invisible (dissolved).
// 0.5f means the texture is half dissolved.
// 0.0f means the texture is completely visible (not dissolved).
uniform float dissolveAmount = 0.0f;

// Range from 0.0f to 1.0f
uniform float burnSize = 0.1f;

uniform float burnBrightness = 1.0f;

// Texture coordinate
in vec2 texCoord;

// Final colour
out vec4 fragColour;

const float SMALL_NUMBER = 0.0001f;

void main()
{
	float value = texture(dissolveTexture, texCoord).r;
    value *= 0.999f;
    float isVisible = value - dissolveAmount;
	if(isVisible < 0.0f) discard;

	fragColour = texture(textureUnit, texCoord) * textureColour;

	float isBurning = smoothstep(abs(burnSize) + SMALL_NUMBER, 0.0f, isVisible) * step(SMALL_NUMBER, dissolveAmount);
	fragColour.rgb += burnColour * isBurning * burnBrightness;

	// Visualise the dissolve texture
	//fragColour.rgb = vec3(isVisible);
	// Visualise the burn effect
	//fragColour.rgb = vec3(isBurning);
}
Conclusion
Thank you for reading this tutorial. You have learned how to create a dissolve shader using the GLSL programming language. You now know how to dissolve an image and add an optional burning effect.
Further Reading
The shader code for this tutorial is inspired by Ronja’s dissolve shader tutorial, so definitely worth a read!
Texture Dissolve | Ronja’s tutorials
Here is another dissolve shader tutorial which produces a very cool visual effect using a burn ramp.

