

Learn how to generate a triangular grid, create walls, connect the triangular cells and render the cells in this Processing tutorial, using the Java programming language.
Introduction
In geometry, a triangular grid is formed by tiling a plane with equilateral triangles, where each cell has exactly 3 neighbours. The triangles used to form the grid must be equilateral, meaning all sides are equal in length and all angles are 60 degrees.
Because the internal angle of the equilateral triangle is 60 degrees, 6 triangles at a point occupy a full 360 degrees. The triangular tiling has Schläfli symbol of {3,6}.
A triangular grid, is also known as triangular tessellation. It is also one of the three regular tilings of the Euclidean plane. It is the only such tiling where the constituent shapes are not parallelogons.
Check out the Wikipedia page for more information.
Open Processing
Open Processing, then create a variable representing the size of a triangle. This is the width and height of a triangle, if a bounding box was drawn around the triangle.
final float triangleSize = 64;
Then create an array list of nodes. Don’t worry about any warnings, we will create the node class later.
ArrayList<Node> nodeList;
Triangle
Next create a new tab called ‘Triangle’. Then create a class called ‘Triangle’ inside the new tab.
class Triangle
{
}
Now give the triangle an array list of PVector, representing the three corners of the triangle.
ArrayList<PVector> vertices = new ArrayList<PVector>(3);
Next give the triangle a color variable.
color col;
Then we will create a new function inside the triangle called Create. The function will create one of two types of triangle depending on the flip boolean. Either the triangle will have it’s point facing up, or it will have it’s point facing down.
We also set the color of the triangle. The colors of the triangles will alternate between grid cells.
  void Create(float x, float y, boolean flip)
  {
    final float hw = triangleSize / 2;
    final float hh = triangleSize / 2;
    if(flip)
    {
      col = color(189, 60, 60);

      vertices.add(new PVector(x - hw, y - hh));
      vertices.add(new PVector(x, y + hh));
      vertices.add(new PVector(x + hw, y - hh));
    }
    else
    {
      col = color(60, 189, 88);

      vertices.add(new PVector(x - hw, y + hh));
      vertices.add(new PVector(x, y - hh));
      vertices.add(new PVector(x + hw, y + hh));
    }
  }
Finally we just need a function to render the triangle.
  void Render()
  {
    fill(col);
    PVector a = vertices.get(0);
    PVector b = vertices.get(1);
    PVector c = vertices.get(2);
    triangle(a.x, a.y, b.x, b.y, c.x, c.y);
  }
Node
Next create a tab called ‘Node’. Then create a class called ‘Node’.
class Node
{
}
Inside the node class we will create a triangle variable.
Triangle triangle = new Triangle();
Then we will create a position variable for the node.
PVector position = new PVector();
Followed by an array list of adjacent nodes.
ArrayList<Node> adjacentNodes = new ArrayList<Node>();
Then a boolean for whether the node is a wall or not.
boolean isWall = false;
Next create a function for adding a node to the adjacent node list, inside of the node class.
void Add(Node other)
{
  adjacentNodes.add(other);
}
Finally outside of the node class, create a function which will be used to create a node and set it’s position.
Node CreateNode(float x, float y)
{
  Node node = new Node();
  node.position.set(x, y);
  nodeList.add(node);
  return node;
}
Math
Create a new tab called ‘Math’.
Then create a function called equals inside of the new ‘Math’ tab.
final float threshold = 0.01;
boolean Equals(PVector a, PVector b)
{
  return abs(a.x - b.x) < threshold && abs(a.y - b.y) < threshold;
}
The function will check if two PVector points are close enough in value to be considered equal.
Generate Triangle Grid
Next create a new tab called ‘Grid’.
Inside the ‘Grid’ tab, create a new function which will be used to generate the triangle grid. The function takes the number of columns and rows used to construct the grid.
void GenerateTriangleGrid(final int columns, final int rows)
{
}
Inside the function, we will create the node list. We reserve enough spaces for all the grid cells.
nodeList = new ArrayList<Node>(columns * rows);
Next we need two variables which will represent a half and a quarter of the size of a triangle.
final float halfSize = triangleSize / 2;
final float quarterSize = triangleSize / 4;
Now we can calculate the start point of the grid. We want the grid to be in the centre of the screen.
final PVector startPoint = new PVector(width / 2, height / 2);
Next we offset the start point, so it is centred.
startPoint.sub(max(columns - 1, 0) * quarterSize, max(rows - 1, 0) * halfSize);
Now create a variable called flip. Which will be used to flip the triangle on the y axis when creating it.
boolean flip = false;
Then we will create a double for loop, which loops through all the rows and columns. For each grid cell we create a node. Then set the node’s position. We are using the centre of the grid cell, hence why the value will be offset.
Next we call the triangle’s ‘Create’ function, and pass in the position and flip value. After that we will flip the flip value.
Once we have looped through every column, we will flip the flip value again if the number of columns is even. This is since we want to have all the triangles which point up in one color. And all the triangles which point down in another color.
for(int y=0; y<rows; ++y)
{
  for(int x=0; x<columns; ++x)
  {
    Node node = new Node();
    nodeList.add(node);
    node.position.set(startPoint);
    node.position.add(x * halfSize, y * triangleSize);

    node.triangle.Create(node.position.x, node.position.y, flip);

    flip = !flip;
  }
  if(columns % 2 == 0) flip = !flip;
}
Create Walls
Create a new function, which will be used to create the walls. The function takes a seed number, which will be used to seed the random number generator. It also takes the number of columns and rows in the grid.
void CreateWalls(final int seed, final int columns, final int rows)
{
}
Inside the function, first seed the random number generator.
randomSeed(seed);
Then calculate the total number of grid cells.
final int total = columns*rows;
Next create an index variable and a node variable.
int index = 0;
Node node = null;
Finally we will loop an arbitrary number of times. Then get a random number between 0 and the total. We obtain a node using this random index value. Then set the wall variable to true, and the color of the node to a dark color.
for(int i=0; i<50; ++i)
{
  index = (int)random(0, total);
  node = nodeList.get(index);
  node.isWall = true;
  node.triangle.col = color(40, 20, 30);
}
Connect Nodes
Create a new function for connecting the nodes together.
void ConnectNodes()
{
}
Inside the function, we first create a variable called count. Then loop through all the nodes we have created. We continue if the node is a wall or if the two nodes are the same.
Then we set count to zero, and loop through the three vertices for two separate triangles. If the two triangles share two vertices, then we add the second node to the first node’s list of adjacent nodes.
int count = 0;
for(Node a : nodeList)
{
  if(a.isWall) continue;
  for(Node b : nodeList)
  {
    if(a == b || b.isWall) continue;
    count = 0;
    for(PVector p1 : a.triangle.vertices)
    {
      for(PVector p2 : b.triangle.vertices)
      {
        count = Equals(p1, p2) ? ++count : count;
      }

      if(count > 1)
      {
        a.Add(b);
      }
    }
  }
}
Setup
Back in the main tab, we will create the Processing setup function.
void setup()
{
  size(720, 720);

  final int columns = 20;
  final int rows = 10;
  GenerateTriangleGrid(columns, rows);
  final int seed = 0;
  CreateWalls(seed, columns, rows);
  ConnectNodes();
}
We first set the size of the window. Then define the number of columns and rows for the grid. Next we generate the triangle grid, then create the walls and finally connect the nodes.
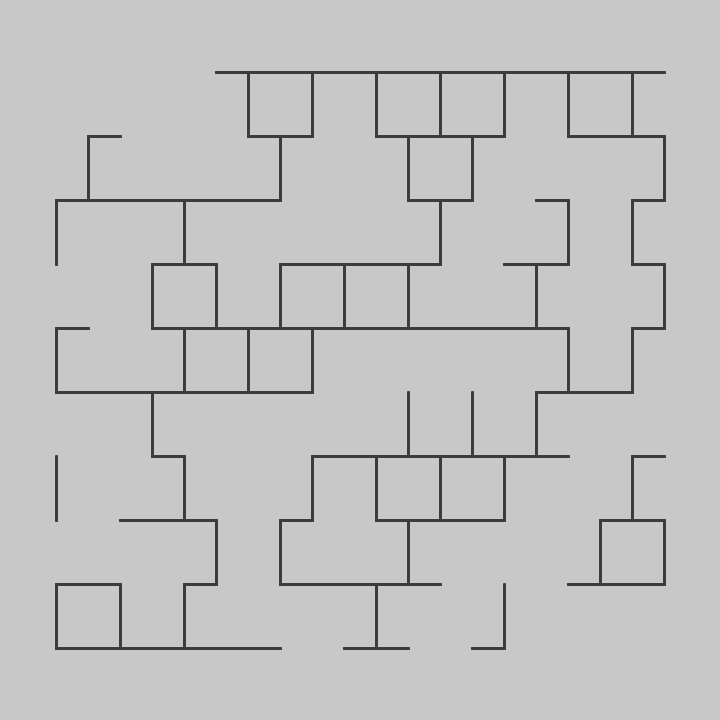
Render Triangles
Create a function for rendering all the grid cells as triangles.
void RenderTriangles()
{
  stroke(40);
  strokeWeight(2);
  for(Node node : nodeList)
  {
    node.triangle.Render();
  }
}

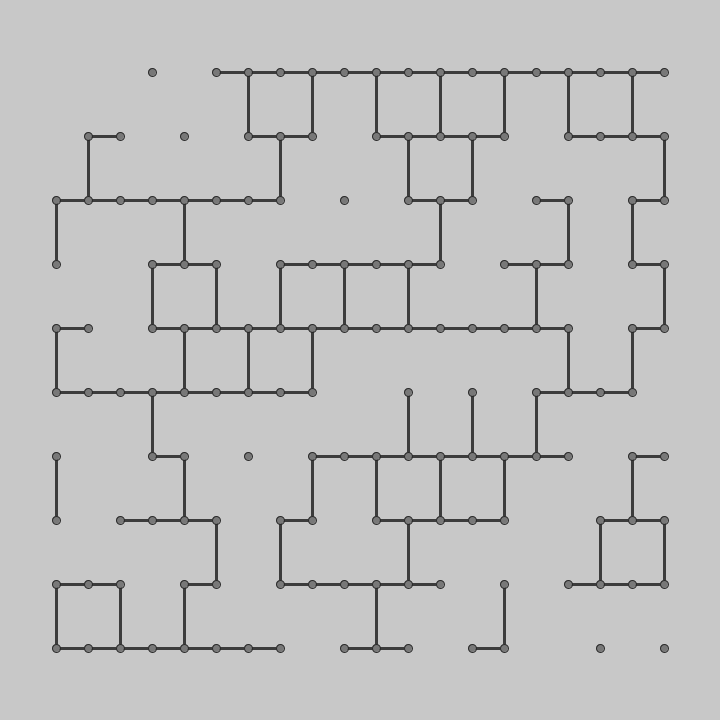
Render Connections
Create another function for rendering all the connections between the nodes as lines.
void RenderConnections()
{
  stroke(60);
  strokeWeight(3);
  fill(160, 160, 20);
  for(Node node : nodeList)
  {
    for(Node a : node.adjacentNodes)
    {
      line(node.position.x, node.position.y, a.position.x, a.position.y);
    }
  }
}
Render Circles
Next create a function for rendering all the nodes which aren’t walls as circles.
void RenderCircles()
{
  stroke(40);
  strokeWeight(1);
  fill(120);
  for(Node n : nodeList)
  {
    if(n.isWall) continue;
    ellipse(n.position.x, n.position.y, 8, 8);
  }
}
Draw
Create the Processing draw function, clear the screen, then call the 3 render functions we created earlier.
void draw()
{
  background(200);
  RenderTriangles();
  RenderConnections();
  RenderCircles();
}
Finally you just need to run the sketch, and you should see a nice grid of triangles!
Conclusion
Thanks for reading this tutorial. You have learned how to generate a triangular grid, create walls, connect the triangular grid cells and render the cells.
Check out the next tutorial, which shows you how to explore the triangle grid using the A-star pathfinding algorithm.
