

A peasant, knight and king walk into a software design tutorial, and are here to teach you the chain-of-responsibility pattern. Learn how to create a chain of handlers which can handle different request types.
Introduction
This tutorial shows you how to code the chain-of-responsibility pattern in the Visual Studio development environment, using a console application and the C++ programming language.
The chain-of-responsibility pattern passes on a request to a chain of handlers one at a time. Each handler can handle different requests. So if the first handler can’t handle the request, then it will pass it on to the next handler. Once a request is handled, the chain ends. Since there is no longer a need to pass on the request.
It is also possible that the request doesn’t get handled by any of the handlers. Since each handler can handle 0, 1 or many requests of different types.
For more information on the chain-of-responsibility pattern, check out the Wikipedia page.
Setup
You can follow along to this tutorial simply by reading it. Or you can code the tutorial by creating a C++ console application in Visual Studio. Where you will be able to run the code, edit it and see the output in the console window.
To code the tutorial, first open ‘Visual Studio’.
Then click on ‘Create a new project’.
Click ‘Console App’, then click next.
Set the ‘Project name’ and ‘Location’ to whatever you want, then press create.
Now you should be able to code the tutorial!
Includes
First include these headers.
#include <algorithm>
#include <iostream>
#include <memory>
#include <string>
#include <vector>
Print line
Next we will create a function which prints a string to the console, and a function which prints a new line to the console.
static void PrintLine(const std::string& message)
{
    std::cout << message << std::endl;
}

static void PrintNewLine()
{
    std::cout << std::endl;
}
Request
Now we will define the request format as a struct. This will allow us to pass around multiple properties. But in this case we simply want to use a string, which represents an item name.
struct Request
{
    std::string mItem;
};
Handler
Next we will define our handler class, which will be implemented by our handler children later on.
class Handler
{
protected:
    std::string mName;

public:
    Handler(const std::string& name)
    {
        mName = name;
    }

    // Pure virtual function has to be implemented by children
    virtual bool HandleRequest(const Request& request) = 0;

    const std::string& GetName()
    {
        return mName;
    }
};
Each handler is given a name. This is just for the tutorial and not necessary for the chain-of-responsibility pattern.
The ‘HandleRequest’ function is the important thing here, since it will be used to handle requests.
Handler children
Now we will implement the 3 handler children. There will be a peasant, knight and king.
The peasant class will handle a request called ‘Pitchfork’. Notice how we use the item name from the request here. We also use the ‘Handler’ constructor to set the name of handler.
class Peasant : public Handler
{
public:
    Peasant() : Handler("Peasant") {}

    bool HandleRequest(const Request& request) override
    {
        return "Pitchfork" == request.mItem;
    }
};
The knight will handle ‘Sword’ and ‘Wine’ requests.
class Knight : public Handler
{
public:
    Knight() : Handler("Knight") {}

    bool HandleRequest(const Request& request) override
    {
        return "Sword" == request.mItem || "Wine" == request.mItem;
    }
};
The king will handle ‘Crown’ and ‘Wine’ requests.
class King : public Handler
{
public:
    King() : Handler("King") {}

    bool HandleRequest(const Request& request) override
    {
        return "Crown" == request.mItem || "Wine" == request.mItem;
    }
};
Since both the knight and king handle ‘Wine’ requests, it means the first one to receive the request will get to drink the wine!
Request Controller
Next we will define a way of chaining our handlers together and sending requests in a class called ‘RequestController’.
The class stores a list of handlers in a ‘std::vector’. Handlers can be added to the list using the ‘AddHandler’ function. We make sure that duplicates can’t be added.
class RequestController
{
private:
    std::vector<std::shared_ptr<Handler>> mHandlers;

public:
    void AddHandler(std::shared_ptr<Handler> handler)
    {
        // No duplicates allowed!
        std::vector<std::shared_ptr<Handler>>::iterator it = std::find(mHandlers.begin(), mHandlers.end(), handler);
        if (it == mHandlers.end())
        {
            mHandlers.push_back(handler);
        }
    }

    bool SendRequest(const Request& request)
    {
        for (std::shared_ptr<Handler>& h : mHandlers)
        {
            if (h->HandleRequest(request))
            {
                PrintLine("Request handled. The " + h->GetName() + " took the " + request.mItem);
                PrintNewLine();
                return true;
            }
            else
            {
                PrintLine(h->GetName() + " couldn't handle the " + request.mItem + " request");
            }
        }

        PrintLine("All handlers failed to handle the " + request.mItem + " request");
        PrintNewLine();
        return false;
    }
};
The ‘SendRequest’ function allows us to send a request to the handlers. We loop through all the handlers until we find one which can handle the request. However, it is also possible the request can’t be handled by our handlers. In each case, we will print to the console window for the sake of the tutorial.
Main function
Inside the main function we will create a ‘RequestController’ instance. Then we will create our 3 handlers: peasant, knight and king.
int main()
{
    RequestController requestController;

    requestController.AddHandler(std::make_shared<Peasant>());
    requestController.AddHandler(std::make_shared<Knight>());
    requestController.AddHandler(std::make_shared<King>());

    requestController.SendRequest({ "Pitchfork" });
    requestController.SendRequest({ "Sword" });
    requestController.SendRequest({ "Crown" });
    requestController.SendRequest({ "Wine" });
    requestController.SendRequest({ "Perfume" });
}
Finally we will send 5 different requests.
Console output
Now you can run the code by pressing CTRL + F5. This will keep the console application open, so you can see the output.
This is what you should see:
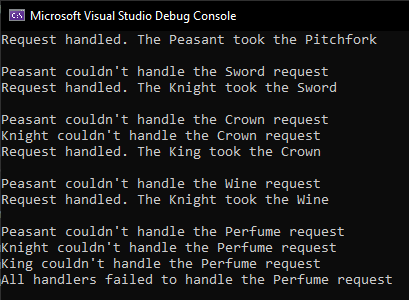
Notice how the first 3 requests are handled by the peasant, knight and king.
The 4th request for the wine could be handled by either the knight or the king. But the knight was the first handler to receive the request, so the knight gets the wine.
The final 5th request called perfume, couldn’t be handled by any of the handlers.
Conclusion
This tutorial has taught you how to use the chain-of-responsibility pattern. You now know how to create a chain of handlers, which can handle 0, 1 or many requests of different types.
Thanks for following this tutorial, see you in the next one!
