

Hello, this tutorial will provide a gentle introduction to Shadertoy. Shadertoy is a browser based shader editor which allows you to easily create and share shaders online. No math or programming knowledge is required to complete this tutorial. This tutorial will teach you all you need to know to start creating shader effects from scratch, so I encourage you to give it a go 🙂
Step 1: New shader
Creating a new shader in Shadertoy is extremely easy. Just go to Shadertoy BETA and click on new in the top right.
Step 2: Hello world
You will be greeted with a screen showing a cool animated gradient effect which looks similar to this.

All the code runs inside of a function called mainImage .
- The opening curly brace
{marks the start of the function. - The closing curly brace
}marks the end of the function.
So first off, delete everything between the curly braces. This will leave us with an empty function.
void mainImage( out vec4 fragColor, in vec2 fragCoord )
{

}
Now lets set every pixel to red, like so.
void mainImage( out vec4 fragColor, in vec2 fragCoord )
{
    fragColor = vec4(1.0, 0.0, 0.0, 1.0);
}
In order to see your code changes you will need to compile it using one of the methods below.
- Press
Alt + Enteron your keyboard. - Or press the triangle button at the bottom middle of the screen. It is highlighted with a blue circle on the screenshot below.

Congratulations you should now see a screen filled with red pixels on the left. Read on to know more!
Step 3: Fragment color
In the last step we set every pixel to red, using this line of code.
fragColor = vec4(1.0, 0.0, 0.0, 1.0);
The fragColor variable is short for fragment color, which represents the current pixel color.
This type of shader is known as a fragment shader, and the same code executes on every pixel in an image.
This fragColor variable is a vec4. A vec4 is a container. In this case we use it to store an RGBA color. Since fragment shaders set pixel colors.
Therefore since we are setting a vec4 like so.
vec4(1.0, 0.0, 0.0, 1.0);
It means the first value we set is red (1.0), the second is green (0.0), the third is blue (blue), and the last value is alpha (1.0). Hence why we end up with all the pixels set to red.
RGBA values are stored in the 0 to 1 range. In image editors, you commonly see the RGBA values stored in the 0 to 255 range. This is the same thing, just in a different number range.
So next, how about we use more than 1 color. But first lets take a quick look at UV coordinates.
Step 4: UV coordinates
In order to set specific pixels, to specific colours, we need to know which pixel we are currently at. The code in a shader is executed on every pixel. But the order in which those pixels get set is not the same each time. This is because graphic cards have many cores which can work on separate pixels in parallel. If this doesn’t make sense to you, then don’t worry!
Every fragment shader gives you the option to use UV coordinates. This is how the UV coordinates are calculated in Shadertoy.
vec2 uv = fragCoord / iResolution.xy;
The UV coordinates are a vec2 in the 0 to 1 range. A vec2 is like a vec4, except it has only 2 values. In this case the 2 values are x and y. The x and y correspond to the pixel position on the screen.
The UV coordinates start at the bottom left corner, and end at the top right corner.
- The bottom left coordinates are (0, 0).
- The middle of the screen coordinates are (0.5, 0.5).
- The top right coordinates are (1, 1)
We will use the UV coordinates in the next step to set the screen to 2 colors.
Step 5: Two colors
Since we now have some knowledge of UV coordinates, we can now determine where a pixel is on the screen. So lets set the top half of the screen to 1 color, and the bottom half of the screen to another color.
First off, lets create 2 colors by using 2 vec4. How about green and blue. Or feel free to pick your own colors.
vec4 green = vec4(0.0, 1.0, 0.0, 1.0);
vec4 blue = vec4(0.0, 0.0, 1.0, 1.0);
In order to find out where our pixel is on the screen, we will need to use a conditional, called an if statement.
if(uv.y < 0.5)
{
    fragColor = green;
}
else
{
    fragColor = blue;
}
The if statement allows us to check if a condition is true. In this case if the y part of the UV coordinate is less than 0.5. This means the pixel is in the the bottom half of the screen. So we set it to green.
If the pixel is not in the bottom part of the screen, then it gets set to blue. The else is used when the condition is false.
Here is the complete code. Copy it into your code editor, and press the triangle button to compile it.
void mainImage( out vec4 fragColor, in vec2 fragCoord )
{
    vec2 uv = fragCoord / iResolution.xy;

    vec4 green = vec4(0.0, 1.0, 0.0, 1.0);
    vec4 blue = vec4(0.0, 0.0, 1.0, 1.0);

    if(uv.y < 0.5)
    {
        fragColor = green;
    }
    else
    {
        fragColor = blue;
    }
}
Congratulations, you should see half the screen filled with green and blue pixels.

Lets learn how to show an image next.
Step 6: Image
Shadertoy has several built in images we can use, called textures. Click on iChannel0 highlighted in white at the bottom of the screen in the screenshot.

Next click on the Textures tab, and pick a texture by clicking on it. Then close the pop up box with the cross. I’m going to pick the London texture on the second page.

In order to see the texture, all we need to do is put this at the bottom of the code above the closing curly brace.
fragColor = texture(iChannel0, uv);
The texture function returns the current pixel at the current UV coordinate for the first channel called iChannel0.
If you were to compile this code, you would see.

Lets combine our texture with our 2 colors in the next step by mixing.
Step 7: Mix
First create a vec4 called pixel, and use it to store the current pixel color from the texture.
vec4 pixel = texture(iChannel0, uv);
This line of code can be removed now.
fragColor = texture(iChannel0, uv);
Next we are going to change the result of the if statement. We will mix the texture color with 1 of the other colors based on the condition of the if statement. The mix function is built into the GLSL programming language.
The mix function below will mix 70% of the pixel color, with 30% of the green color. The last value in the function represents the mix percentage of the first and second value. All the values in the mix function are in the 0 to 1 range.
fragColor = mix(pixel, green, 0.3);
We will do the same for the pixel color and blue.
fragColor = mix(pixel, blue, 0.3);
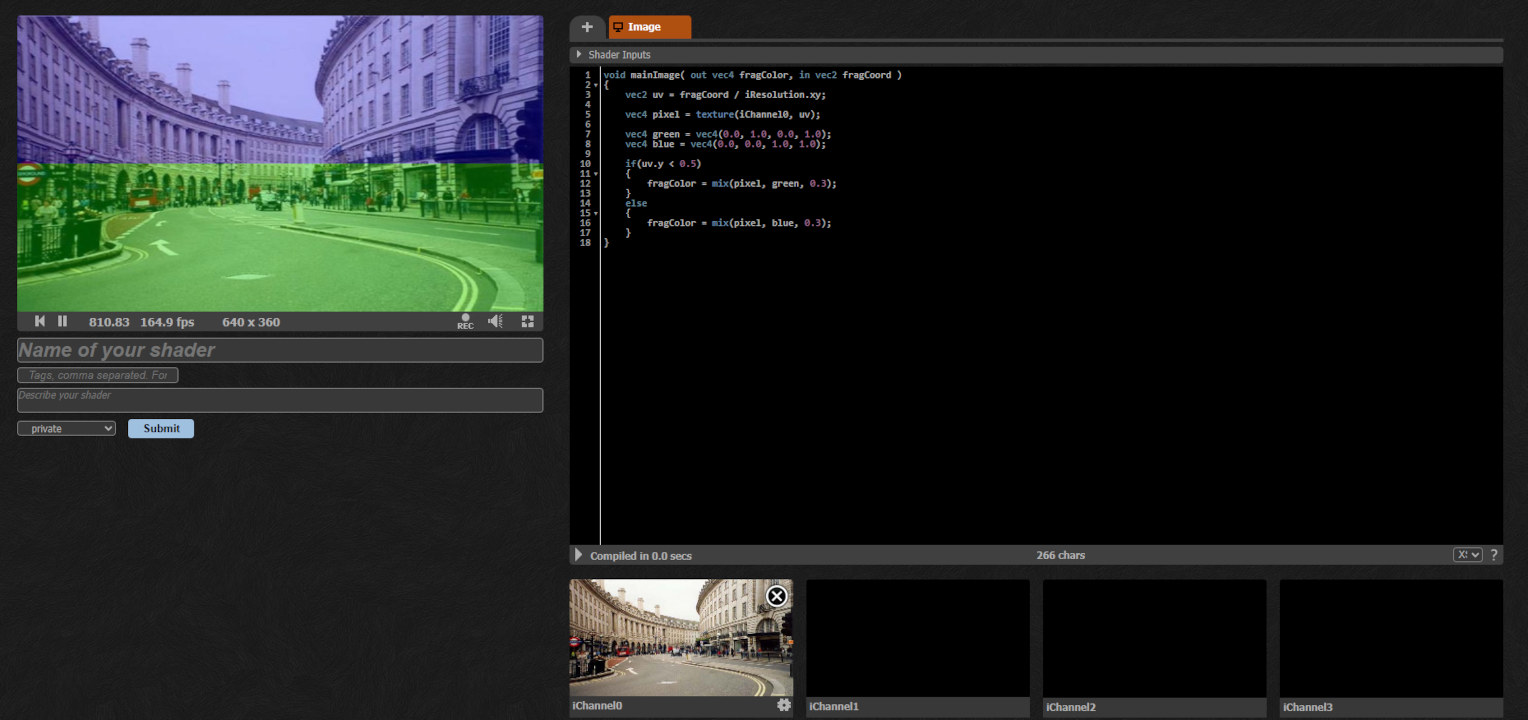
This is what the final code looks like.
void mainImage( out vec4 fragColor, in vec2 fragCoord )
{
    vec2 uv = fragCoord / iResolution.xy;

    vec4 pixel = texture(iChannel0, uv);

    vec4 green = vec4(0.0, 1.0, 0.0, 1.0);
    vec4 blue = vec4(0.0, 0.0, 1.0, 1.0);

    if(uv.y < 0.5)
    {
        fragColor = mix(pixel, green, 0.3);
    }
    else
    {
        fragColor = mix(pixel, blue, 0.3);
    }
}
Final result
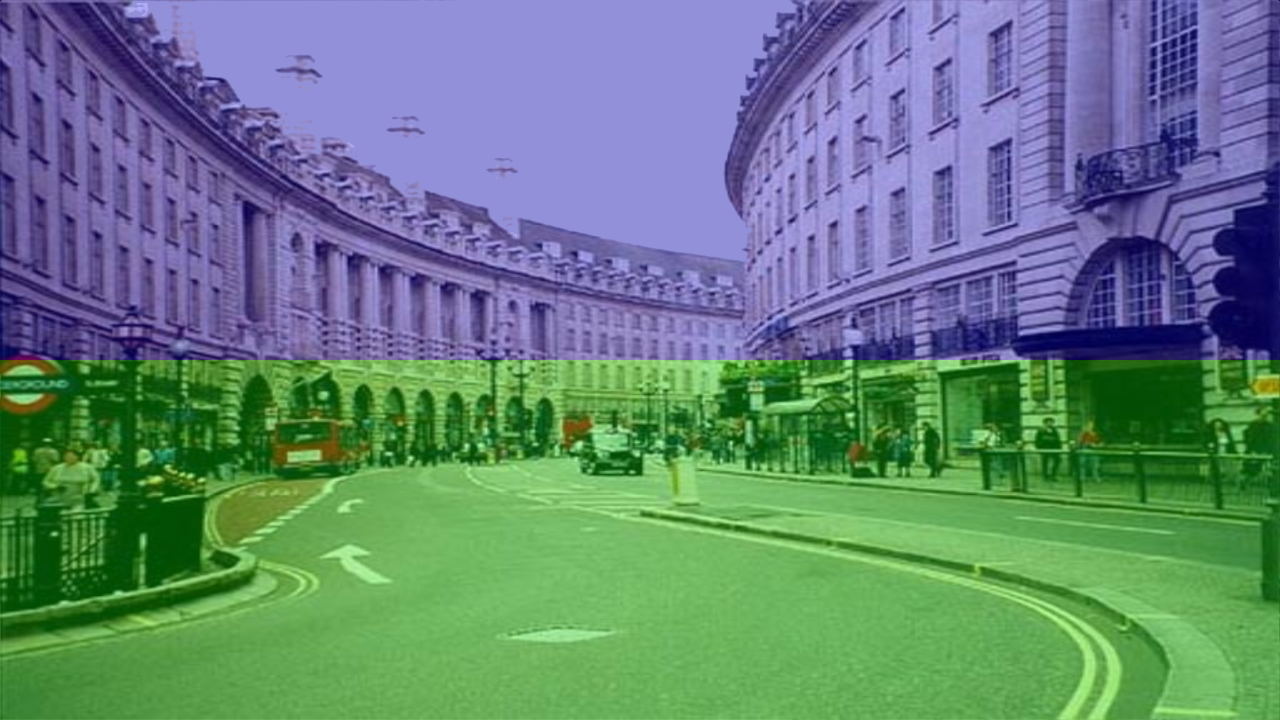
You can also view the final shader on Shadertoy here.
Conclusion
We have learned how to create fragment shaders in Shadertoy. We set pixel colors, used UV coordinates, and combined an image with arbitrary colors using the mix function.
In order to expand on this shader you could:
- Change the colors.
- Change the texture.
- Change the UV coordinate from
ytox. - Change the mix percentage.
Feel free to experiment, and have fun!
If you want to keep your work, you can select all the code and copy it into a text file to save somewhere on your computer. Or you can create a free Shadertoy account and save it to your account.
Thank you for reading this tutorial. I hope it has shown you that shader programming is not for the chosen few, and can be done by anyone.

2 responses to “A gentle introduction to Shadertoy”
so, say I want a layer screen size relative to my work where every other pixel is either blackened or whitened, this tool for that job?
Good question. You can easily create a checkerboard or halftone pattern in a shader. Or brighten and darken pixels. And this would scale nicely to any size.
However Shadertoy doesn’t let you change the resolution of the viewport. You have the small view and the fullscreen view. So I would say Shadertoy is good for prototyping ideas, but not good for image editing.
You also can’t upload your own textures, you can only use the presets.
However you could create something in the shader, fullscreen it and take a screenshot. There’s even a record button, which lets you record a video.
Image editors like Adobe Photoshop and GIMP let you do scripting, so you could technically use the scripting language to create something similar to what you see in Shadertoy.
I was thinking about writing a tool which would let you create textures in a shader, at any image size. Then use this in the image editor. Or let you bring your image from the image editor into the tool, and use the tool to edit it.