
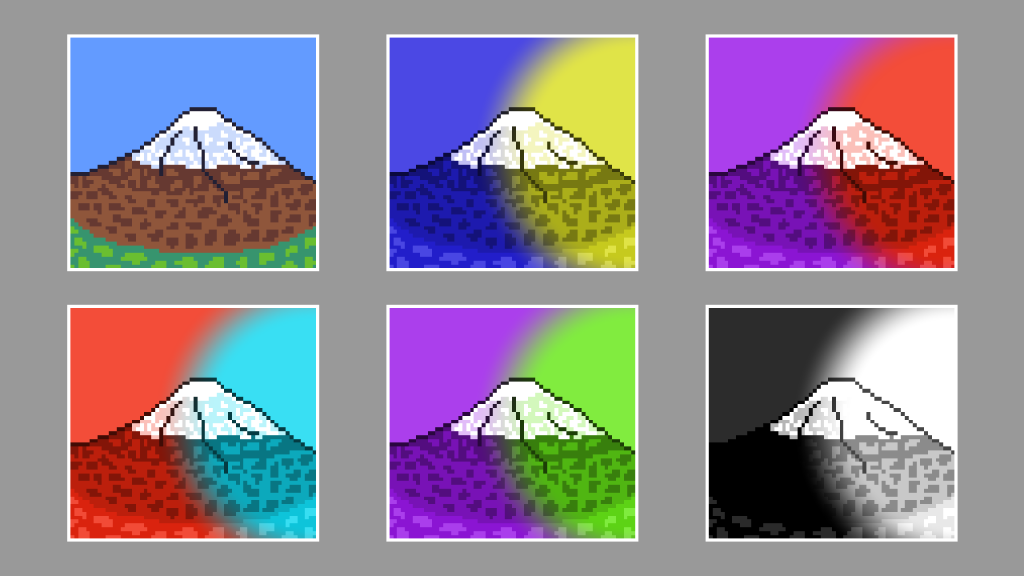
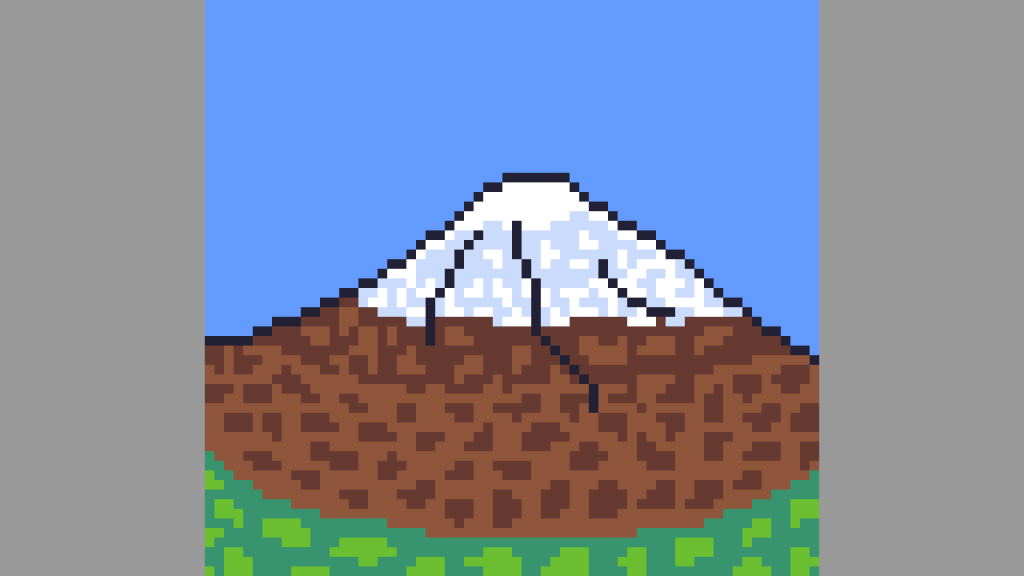
This tutorial demonstrates creating a duotone circle effect in a GLSL shader using a sprite of a mountain which I created in Aseprite. By following the outlined steps, you can achieve a visually appealing result.
The process involves details such as aspect ratio correction, creating a circle, converting to greyscale, overlaying colours, and setting the alpha channel. Experiment with different colours for a personalised touch. Happy creating!
Step 1: Get the current pixel colour
vec4 pixel = texture(textureUnit, texCoord);Step 2: Aspect ratio
The texture size and offset are passed into the shader. The texture size is in pixels. Whilst the offset is in the -1 to 1 range.
// Texture size
uniform vec2 size = vec2(1.0f, 1.0f);
uniform vec2 offset = vec2(0.0f, 0.0f);
The texture size is used to calculate the aspect ratio, which is used later to make the circle shape circular.
vec2 aspect = size / min(size.x, size.y);Since if there is a wide or tall rectangle texture, then the circle will actually be an ellipse. This is how it would look without the aspect ratio correction using the following code.
float c = Circle(pos, 0.5f);
c = 1.0f - smoothstep(0.0f, 0.01f, c);
Step 3: Create a circle
This Circle function takes a position and a radius, and returns the distance from the circle centre.
float Circle(vec2 pos, float radius)
{
    return length(pos) - radius;
}
We then create a position variable starting at the centre of the screen. The position is then offset using the uniform value passed into the shader. Then the position is aspect ratio corrected and passed into the circle function. Lastly smoothstep is used to create a smooth greyscale circle. The value is inverted so the circle is white at the centre. This will be useful later.
// Create circle
vec2 pos = texCoord - 0.5f;
pos += offset;
float c = Circle(pos * aspect, 0.42f);
c = 1.0f - smoothstep(0.0f, 0.24f, c);
Greyscale circle
fragColour.rgb = vec3(c);
Purple and red circle
fragColour.rgb = vec3(mix(shadow, highlight, c));
Step 4: Convert to greyscale
Convert the current pixel colour to greyscale. More details here.
const vec3 GREY_WEIGHTS = vec3(0.299f, 0.587f, 0.114f);
vec3 greyscalePixel = vec3(dot(pixel.rgb, GREY_WEIGHTS));
Step 5: Overlay
We pass in two shader uniforms for the shadow and highlight colours.
uniform vec3 shadow;
uniform vec3 highlight;
We mix the shadow and highlight colour with the circle distance to decide which colour the current pixel should be. Then we pass this into the Overlay function with the greyscale pixel colour to produce the duotone circle effect.
fragColour.rgb = Overlay(greyscalePixel, mix(shadow, highlight, c));The Overlay blend mode is commonly found in image editors like Adobe Photoshop and GIMP. It combines Multiply and Screen blend modes. More information here.
float Overlay(float a, float b)
{
	if(a < 0.5f) return 2.0f * a * b;
	return 1.0f - 2.0f * (1.0f - a) * (1.0f - b);
}

vec3 Overlay(vec3 a, vec3 b)
{
	float red = Overlay(a.r, b.r);
	float green = Overlay(a.g, b.g);
	float blue = Overlay(a.b, b.b);
	return vec3(red, green, blue);
}
Finally set the alpha channel to the original pixel colour.
fragColour.a = pixel.a;The final result is this duotone circle effect.


Feel free to experiment with different colours.
Thank you for reading this tutorial, I hope you found it useful!
See this tutorial for how to create a duotone circle in GIMP.
