
This tutorial leads on from the last tutorial about creating a glitch effect using displacement lines.
Glitch shader effect with displacement lines – Agate DRAGON
The current tutorial will add blocks of different sizes and colours, at different time segments to enhance the glitch effect.
Full GLSL code:
#version 330 core

uniform float timeSeconds = 0.0f;

uniform float horizontalOffset = 0.16f;

// Texture Unit
uniform sampler2D textureUnit;

// Texture coordinate
in vec2 texCoord;

// Final colour
out vec4 fragColour;

// Options for horizontal displacement direction
const float LEFT = -1.0f;
const float RIGHT = 1.0f;

const float MIX_STRENGTH = 0.5f;

// Block colours
const vec3 RED = vec3(1.0f, 0.0f, 0.0f);
const vec3 GREEN = vec3(0.22f, 1.0f, 0.12f);
const vec3 BLUE = vec3(0.12f, 0.22f, 1.0f);

// Block sizes
const vec2 SMALL_BLOCK = vec2(0.1f, 0.026f);
const vec2 MEDIUM_BLOCK = vec2(0.2f, 0.032f);
const vec2 LARGE_BLOCK = vec2(0.4f, 0.048f);

void DisplacementLine(vec2 uv, float dirX, float time, float t1, float t2, float y1, float y2, vec3 tint)
{
	if(time > t1 && time < t2 && uv.y > y1 && uv.y < y2)
	{
		uv.x += horizontalOffset * dirX;
		fragColour = texture(textureUnit, uv);
		fragColour.rgb = mix(fragColour.rgb, tint, MIX_STRENGTH);
	}
}

// An SDF box
// https://iquilezles.org/articles/distfunctions2d/
float Box(in vec2 p, in vec2 b)
{
	vec2 d = abs(p)-b;
	return length(max(d,0.0)) + min(max(d.x,d.y),0.0);
}

float Block(vec2 pos, vec2 size, float time, float t1, float t2)
{
	if(time < t1 || time > t2)
	{
		return 0.0f;
	}

	float b = Box(pos, size);
	return step(b, 0.0f);
}

void main()
{
	fragColour = texture(textureUnit, texCoord);

	// Create a looping value between 0 and 1,
	// using the fractional part of the time in seconds
	float t = fract(timeSeconds);

	vec2 uv = texCoord;

	// Position from the centre
	vec2 centre = uv - 0.5f;

	// Create red blocks
	float redBlocks = 0.0f;
	redBlocks += Block(centre, MEDIUM_BLOCK, t, 0.1f, 0.2f);
	redBlocks += Block(centre + vec2(-0.28f, -0.34f), LARGE_BLOCK, t, 0.3f, 0.4f);
	redBlocks += Block(centre + vec2(0.2f, 0.35f), SMALL_BLOCK, t, 0.5f, 0.6f);
	redBlocks += Block(centre + vec2(-0.12f, -0.25f), MEDIUM_BLOCK, t, 0.7f, 0.8f);
	redBlocks += Block(centre + vec2(0.0f, 0.32f), LARGE_BLOCK, t, 0.85f, 0.95f);
	if(redBlocks > 0.0f)
	{
		fragColour.rgb = mix(fragColour.rgb, RED * redBlocks, MIX_STRENGTH);
	}

	// Create green blocks
	float greenBlocks = 0.0f;
	greenBlocks += Block(centre + vec2(0.1f, 0.2f), SMALL_BLOCK, t, 0.1f, 0.2f);
	greenBlocks += Block(centre + vec2(-0.18f, -0.44f), MEDIUM_BLOCK, t, 0.3f, 0.4f);
	greenBlocks += Block(centre + vec2(0.3f, 0.15f), LARGE_BLOCK, t, 0.5f, 0.6f);
	greenBlocks += Block(centre + vec2(-0.22f, -0.35f), LARGE_BLOCK, t, 0.7f, 0.8f);
	greenBlocks += Block(centre + vec2(0.1f, 0.22f), MEDIUM_BLOCK, t, 0.85f, 0.95f);
	if(greenBlocks > 0.0f)
	{
		fragColour.rgb = mix(fragColour.rgb, GREEN * greenBlocks, MIX_STRENGTH);
	}

	// Create blue blocks
	float blueBlocks = 0.0f;
	blueBlocks += Block(centre + vec2(0.05f, -0.1f), LARGE_BLOCK, t, 0.1f, 0.2f);
	blueBlocks += Block(centre + vec2(-0.08f, 0.64f), MEDIUM_BLOCK, t, 0.3f, 0.4f);
	blueBlocks += Block(centre + vec2(-0.4f, 0.25f), MEDIUM_BLOCK, t, 0.5f, 0.6f);
	blueBlocks += Block(centre + vec2(-0.08f, 0.55f), LARGE_BLOCK, t, 0.7f, 0.8f);
	blueBlocks += Block(centre + vec2(-0.2f, -0.32f), SMALL_BLOCK, t, 0.85f, 0.95f);
	if(blueBlocks > 0.0f)
	{
		fragColour.rgb = mix(fragColour.rgb, BLUE * blueBlocks, MIX_STRENGTH);
	}

	// Create displacement lines
	// Top
	DisplacementLine(uv, LEFT, t, 0.7f, 0.8f, 0.05f, 0.1f, vec3(1.0f, 0.24f, 0.44f));

	DisplacementLine(uv, LEFT, t, 0.25f, 0.35f, 0.2f, 0.25f, vec3(0.24f, 0.32f, 1.0f));
	DisplacementLine(uv, RIGHT, t, 0.65f, 0.75f, 0.3f, 0.35f, vec3(0.34f, 1.0f, 0.12f));

	// Middle
	DisplacementLine(uv, LEFT, t, 0.4f, 0.5f, 0.45f, 0.5f, vec3(0.24f, 0.12f, 1.0f));

	DisplacementLine(uv, RIGHT, t, 0.1f, 0.2f, 0.6f, 0.65f, vec3(0.14f, 1.0f, 0.42f));
	DisplacementLine(uv, LEFT,  t, 0.8f, 0.9f, 0.7f, 0.75f, vec3(1.0f, 0.32f, 0.32f));

	// Bottom
	DisplacementLine(uv, RIGHT, t, 0.25f, 0.35f, 0.9f, 0.95f, vec3(0.14f, 0.42f, 1.0f));
}
A block will only be added if the fractional time is within the time segment:
	if(time < t1 || time > t2)
	{
		return 0.0f;
	}
A block is created using a signed distance field (SDF) box:
float Box(in vec2 p, in vec2 b)
{
	vec2 d = abs(p)-b;
	return length(max(d,0.0)) + min(max(d.x,d.y),0.0);
}
The formula for the SDF box comes from here:
https://iquilezles.org/articles/distfunctions2d/
The formula gets you the distance from the centre of the box, which is a greyscale value. The closest values at the centre are 0, whilst the furthest values are 1.
If you were to output the box distance as a colour, then you would get something like this:
vec2 pos = texCoord - 0.5f;
vec2 size = vec2(0.2, 0.1);
float b = Box(pos, size);
fragColour = vec4(vec3(b), 1.0);
Using the GLSL step function, we can split the box into a white area, and a black area. Where white will represent the box, and black will represent what is outside the box:
vec2 pos = texCoord - 0.5f;
vec2 size = vec2(0.2, 0.1);
float b = Box(pos, size);
b = step(b, 0.0f);
fragColour = vec4(vec3(b), 1.0);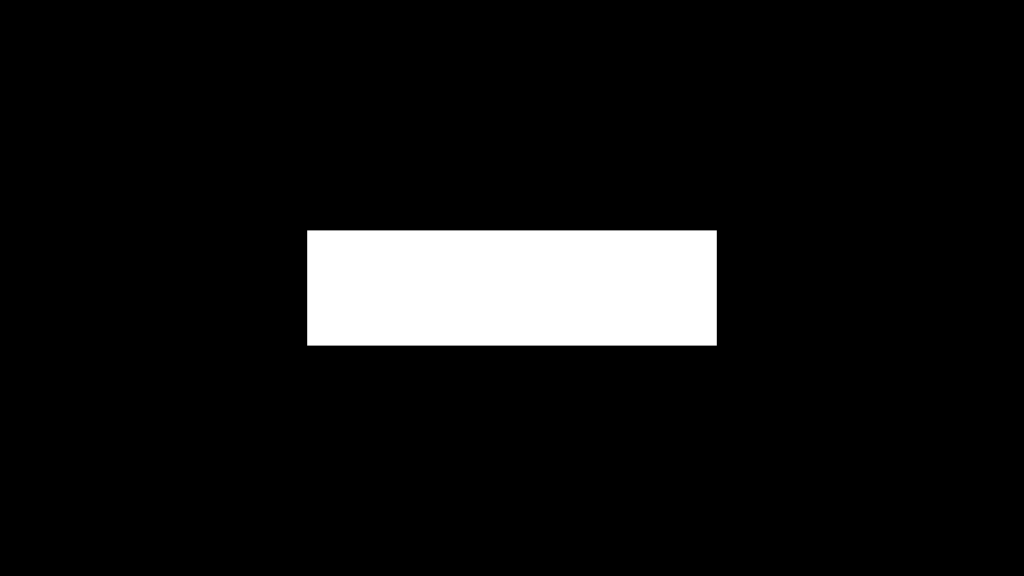
The block function requires a position, size and time segment (t1 to t2) in which it will appear:
float Block(vec2 pos, vec2 size, float time, float t1, float t2)We can create blocks of different sizes and add them together. The boxes are grouped by colour, so they can be tinted.
	float redBlocks = 0.0f;
	redBlocks += Block(centre, MEDIUM_BLOCK, t, 0.1f, 0.2f);
	redBlocks += Block(centre + vec2(-0.28f, -0.34f), LARGE_BLOCK, t, 0.3f, 0.4f);
The boxes are only used if the current distance value is greater than 0, which would mean we are in the white area of the box. We mix the original or last fragment colour with the tinted block colour, so that the block appears transparent:
	if(redBlocks > 0.0f)
	{
		fragColour.rgb = mix(fragColour.rgb, RED * redBlocks, MIX_STRENGTH);
	}
The process is repeated for green and blue boxes in the code above. But you could change the colour or add more boxes. There are lots of variables which can be played with.
Thank you for reading this tutorial, I hope you found it useful!
Read on to learn how to add RGB split to the current glitch shader.
